


Home Bread Baking Is Having a Moment—Here’s How to Get Better at It
I’ve noticed something lately.
Sourdough starters are getting names. Dutch ovens are selling out. Instagram feeds are filled with crust shots and crumb reveals.
Bread baking has officially become a movement. Honestly, I love seeing it.
Part of the reason is personal. I baked bread at home for years. At one point, I had a sourdough starter that was well over a decade old.
It wasn’t just any starter. It was handed down to me from Chef Peter Berley, who received it from Angelica Kitchen in New York City. That culture was alive, resilient, and full of history.
Then, my home refrigerator failed. Like many bakers before me, I lost everything.
That experience stayed with me.
Fast forward to now. Both of my adult kids are baking at home. They’re having fun with it. Their bread is good—really good. Watching them brought me right back to my own days of flour-dusted counters and long ferments.
It also reminded me of something important.
No matter how good your bread is, there’s always room for improvement.
This blog is for anyone baking at home. Maybe you’re just starting. Maybe you’re returning after a break. Or perhaps you’re making solid loaves but want to reach the next level.
You don’t need expensive equipment. Sometimes one or two small shifts in technique make a meaningful difference.
I’ve rounded up timeless techniques and baker’s wisdom inspired by some of the best bakers in the United States. These are practical improvements you can apply immediately.
If even one of these pointers helps your next loaf rise higher or taste deeper, this was worth writing.
Let’s get into it.
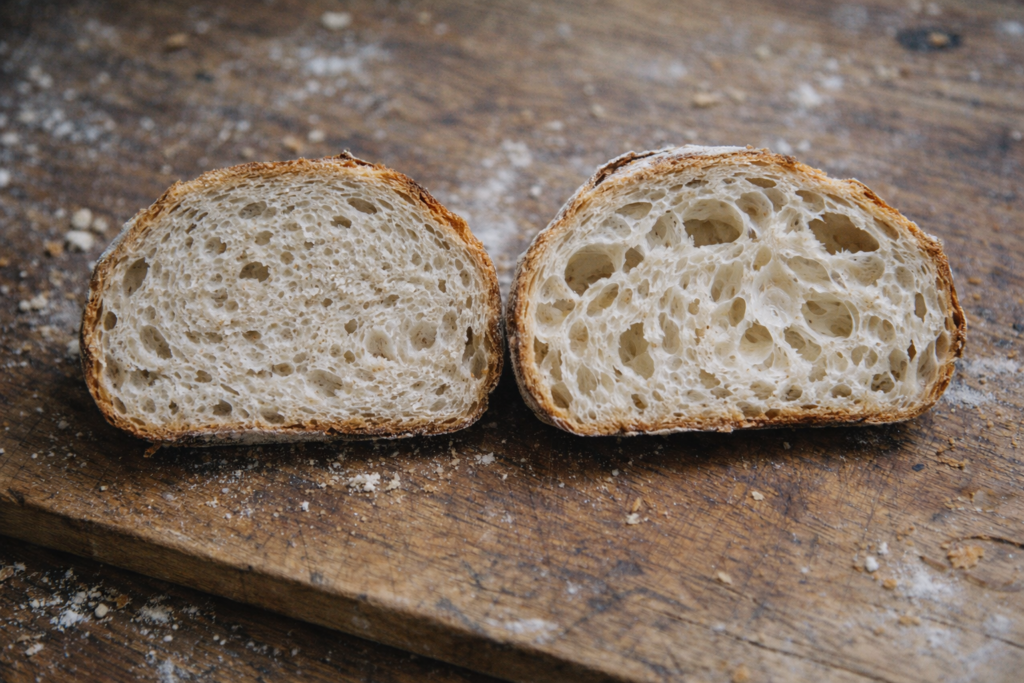
Why Is My Bread Dense? (The Role of Patience)
It’s the most common question I get from home bakers.
“My flavor is okay, but why is my bread dense? Why is it heavy like a brick?”
If you’re frustrated, I have good news. It’s usually not your flour. It’s almost certainly not your oven.
It’s your clock.
We live in a world that demands speed. We want things now. But bread doesn’t care about your schedule. Bread is biology. It’s a living thing.
When you rush fermentation, you don’t give the yeast enough time to produce the carbon dioxide needed for lift. You don’t give the gluten structure time to relax and expand.
The result is a dense, tight crumb that feels heavy in your stomach.
To bake better bread, you have to stop baking by time and start baking by observation.
If a recipe says “proof for 1 hour” but your kitchen is 68 degrees, that dough might need three hours. If you put it in the oven at one hour because the recipe said so, you guarantee a dense loaf.
Great bakers don’t force the dough. They wait for it.
This is the mindset shift. Stop asking “Is it time?” and start asking “Is it ready?”
Once you accept that the dough is in charge, your bread instantly gets lighter.
7 Professional Techniques to Upgrade Your Loaf
Ready to stop guessing? Here are seven adjustments that move you from “recipe follower” to “baker.”
1. Fermentation: The Flavor Engine
If there’s one thing nearly every great baker agrees on, it’s this: Time matters more than technique.
Bakers like Tartine and Bread Alone didn’t build their reputations on speed. They built them on long, natural fermentation.
That extra time allows enzymes and wild yeast to do two critical things: develop complex flavor and improve digestibility.
At home, this means:
- Use less yeast. If a recipe calls for a tablespoon of commercial yeast, try using half and doubling the rise time.
- Embrace the fridge. This is the pro move. Let your dough do its final rise in the refrigerator overnight (12–18 hours). Cold slows down the yeast but lets the bacteria (lactobacillus) create those deep, tangy acids.
- Don’t rush the bulk. The “bulk fermentation” (the first rise) is where the structure is built. If you cut it short, you get density.
If your bread tastes flat, it’s usually not missing salt. It’s missing time.
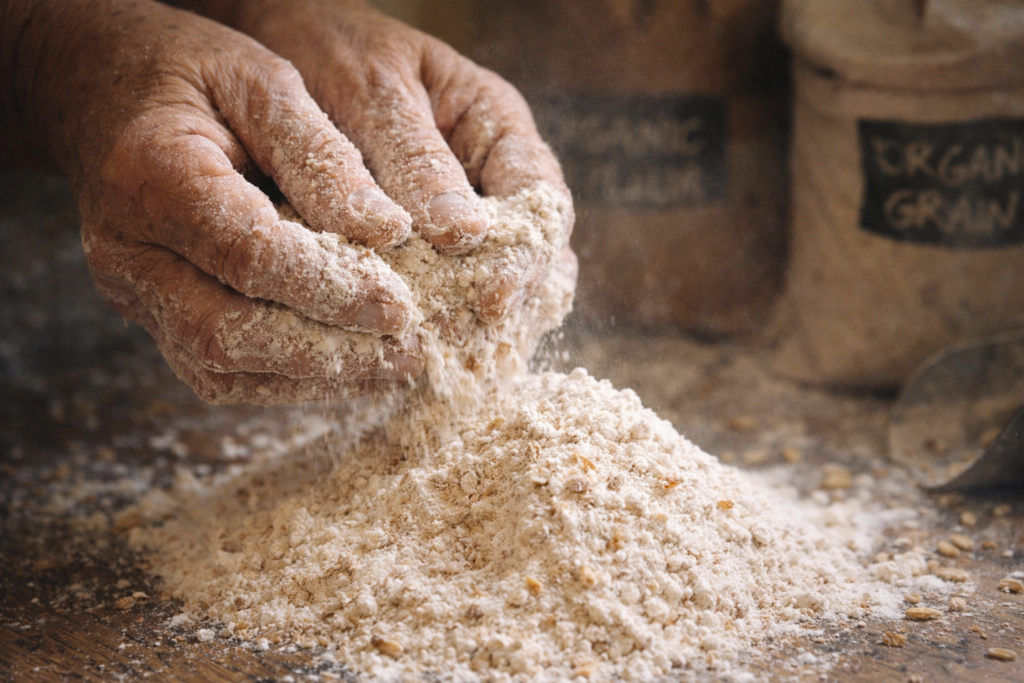
2. Flour Isn’t Just Flour—Start With Better Grain
One of the biggest upgrades a home baker can make is simply choosing better flour.
Flour is the soul of bread. It’s not just white powder; it’s ground grain. Great bakers obsess over protein levels and extraction rates because they determine the texture.
If you are using generic, bleached all-purpose flour from the bottom shelf, you are fighting a losing battle.
Try this:
- Go Unbleached: Bleaching agents damage the flour’s flavor potential. Always buy unbleached.
- Check the Protein: For artisan bread, you want “Bread Flour” with 11.5% to 13% protein. This provides the strength needed for a high rise.
- Add Freshness: Experiment with mixing in 10-20% fresh-milled whole wheat or rye. It adds enzyme activity that supercharges fermentation.
Better flour gives you more forgiveness, better structure, and flavor that actually tastes like grain.
3. Hydration Changes Everything—But Don’t Chase Extremes
High-hydration doughs (wet doughs with big holes) look impressive on Instagram. But great bread isn’t about how wet the dough is—it’s about control.
If you are a beginner trying to handle 85% hydration dough, you will end up with a sticky, unmanageable mess.
Bakers influenced by Acme Bread and Peter Reinhart teach that hydration should match your skill level.
For home bakers:
- Start Manageable: Aim for 65–70% hydration. This creates a dough that is soft but not soup.
- Feel, Don’t Just Look: Learn how the dough should feel. It should be tacky (like a Post-it note), not sticky (like gum).
- Increase Gradually: Once you master a 70% loaf, bump it up by 2%. Wet dough rewards patience, not force.
4. Handle Dough Gently—Strength Comes From Technique, Not Muscle
One of the most common mistakes I see is overworking the dough.
Are you aggressively kneading your dough like you’re angry at it? You’re likely squeezing out all the gas you worked so hard to create.
Modern artisan bakers rely on stretch-and-folds, not aggressive kneading.
Think of dough like this:
- Organize, Don’t Punish: You are organizing the gluten strands into layers, not beating them into submission.
- The Stretch-and-Fold: Instead of kneading, simply grab the dough, stretch it up gently, and fold it over itself. Do this four times (North, South, East, West) every 30 minutes during the first two hours.
- Preserve the Air: This gentle handling preserves the gas bubbles, which is exactly how to get an open crumb in sourdough or yeast breads.
If your crumb is tight and dense, it’s often because the dough was handled too roughly when it was fragile. Treat it like a living thing.
5. Temperature Is an Ingredient You Can’t Ignore
Professional bakers control temperature obsessively. Home bakers often ignore it.
Fermentation speed, flavor development, and dough strength all change dramatically with temperature. Yeast works much faster at 80°F than at 70°F.
Simple home fixes:
- Adjust Your Water: In winter, use slightly warmer water (85–90°F) to wake up the yeast. In summer, use cool water to prevent the dough from over-proofing.
- The ‘Oven Light’ Trick: If your house is cold, let your dough ferment in the oven with just the light on. This usually creates a perfect 75–78°F environment.
- Get a Thermometer: It’s the cheapest tool that makes the biggest difference. Know the temperature of your dough, not just your air.
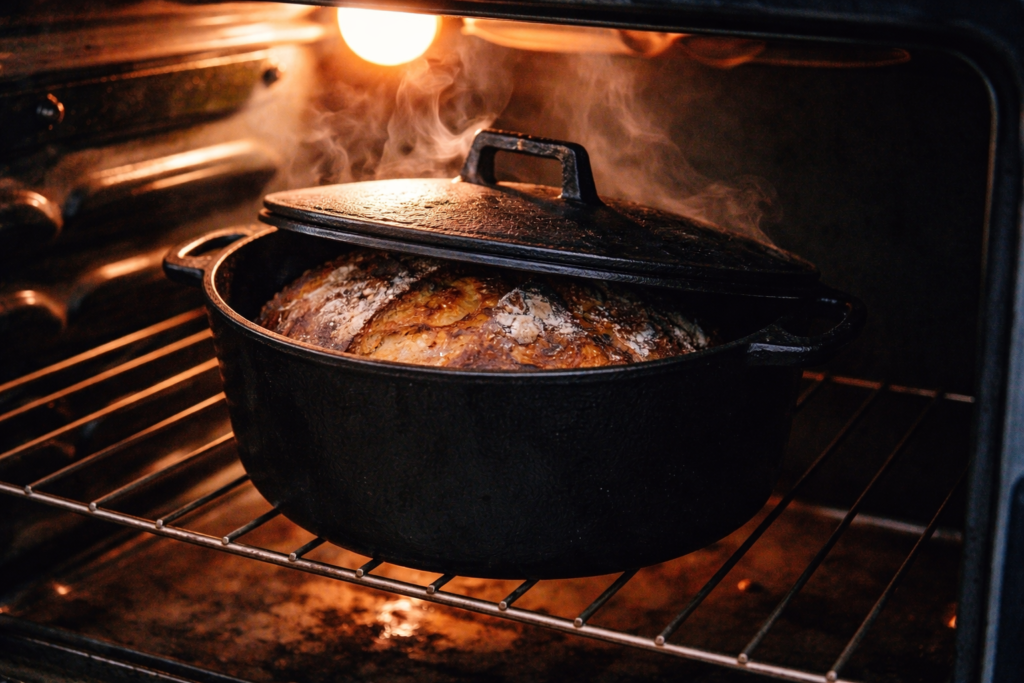
6. Why Baking Bread in Dutch Oven Changes Everything
That dramatic oven spring? That blistered, shiny crust you admire at the bakery?
That comes from steam.
Professional ovens inject steam during the first 20 minutes of baking. This keeps the crust soft and flexible, allowing the loaf to expand fully before the crust hardens.
Home ovens are designed to be dry. That’s the problem.
This is why baking bread in a Dutch oven is the single most effective hack for home bakers.
How it works:
- Trapped Moisture: As the dough heats up, it releases water. The heavy lid of the Dutch oven traps that steam tight against the loaf.
- Artificial Steam Injector: Essentially, you are creating a miniature professional steam oven inside your regular oven.
- The Method: Bake with the lid ON for the first 20–25 minutes (to get the rise). Remove the lid for the last 15–20 minutes (to caramelize the crust and get that deep crunch).
If you are trying to bake artisan bread on a cookie sheet, you will always struggle. Use a Dutch oven.
Choosing the Right Dutch Oven:
Not all Dutch ovens are created equal for bread baking. Here’s what matters:
- Size: A 5-quart Dutch oven is ideal for most home loaves. Too small and your bread hits the lid. Too large and you lose steam concentration.
- Material: Cast iron (like Lodge or Le Creuset) retains heat beautifully and creates an even bake. Enameled versions work great and are easier to clean.
- Heat Rating: Make sure your Dutch oven and lid can handle 450–500°F. Some knobs can’t take high heat — replace them with metal knobs if needed.
The Safe Transfer Method:
One of the biggest challenges is getting your delicate, proofed dough into a screaming hot Dutch oven without burning yourself or deflating the loaf.
Here’s the pro move:
- Preheat the Dutch oven in your oven at 475–500°F for at least 30 minutes. You want it ripping hot.
- Use parchment paper as a sling: Place your proofed dough on a sheet of parchment paper. When it’s time, grab the edges of the parchment and lift the whole thing into the Dutch oven.
- Score quickly: Use a sharp blade or lame to score the top of your dough just before it goes in. This controls where the bread expands.
- Lid on, timer set: Cover immediately and return to the oven.
This method eliminates the risk of burns and keeps your beautiful shape intact.
Timing and Temperature:
Here’s the proven sequence:
- Phase 1 (Lid On): Bake at 475°F for 20–25 minutes. This is when all the magic happens — the steam, the rise, the structure.
- Phase 2 (Lid Off): Drop the temperature to 425–450°F and bake uncovered for 15–25 minutes, depending on how dark you want your crust.
- The Tap Test: When done, the loaf should sound hollow when you tap the bottom. Internal temp should be around 205–210°F.
Troubleshooting Common Dutch Oven Issues:
- Burned Bottom? Your oven runs hot on the bottom rack. Try placing the Dutch oven on a higher rack or putting a baking sheet underneath to deflect direct heat.
- Pale Crust? You either removed the lid too early (didn’t let the crust set) or your oven temp dropped. Increase baking time with the lid off.
- Dough Sticking? Use enough parchment paper or lightly dust the paper with rice flour or cornmeal. Regular flour can burn and stick.
- Loaf Spreading Instead of Rising? Your dough was under-proofed or over-hydrated. Tighten your shaping and give it more time to develop structure before baking.
Alternatives to Dutch Ovens (If You Don’t Have One):
If you don’t own a Dutch oven yet, here are two temporary workarounds:
- The Roasting Pan Method: Place your dough on a baking stone or sheet. Cover with a large stainless steel bowl or roasting pan to trap steam. Remove the cover halfway through.
- The Steam Tray Method: Place a metal tray on the lowest oven rack during preheat. When you load your bread, pour 1 cup of boiling water into the hot tray and quickly close the door. This creates a burst of steam (though not as effective as a Dutch oven).
But honestly? If you are serious about home bread baking, a Dutch oven is worth every penny. It’s the single piece of equipment that closes the gap between home and bakery results.
7. Learn to Read the Bread, Not the Clock
The best bakers don’t bake by time. They bake by observation.
They look at:
- Volume: Has it actually doubled?
- Tension: Does the surface feel tight and springy?
- Aroma: Does it smell yeasty and sweet?
- Response: If you poke it, does it spring back slowly (ready) or collapse (over-proofed)?
If you only follow a recipe timer, you will eventually be frustrated. If you learn to read the dough, you will improve fast.
Final Thought: Bread Is a Skill, Not a Trend
Yes, home bread baking is trending right now. But bread itself is timeless.
The bakers who shaped modern American bread culture—from Tartine to Bread Alone—all share one belief:
Bread rewards patience, attention, and respect for the process.
If you slow down, use better ingredients, and let fermentation do the heavy lifting, your bread will get better. And when it does, you’ll understand why bakers never really stop baking.
Enjoy.